# Spring Data JPA One To One Relationship Mapping Example
By Atta Ur Rehman Shah (https://attacomsian.com/about). Published Oct 12, 2019, updated Sep 25, 2022. Topics: Spring Boot, Spring Data JPA, MySQL.
Canonical URL: https://attacomsian.com/blog/spring-data-jpa-one-to-one-mapping
> A complete guide for defining and using a one-to-one relationship mapping in a Spring Data JPA and MySQL project.
[Spring Data JPA](https://attacomsian.com/blog/getting-started-spring-data-jpa) provides excellent support for creating Spring-powered applications that communicate with different relational databases to implement JPA-based repositories.
[Java Persistence API](https://jcp.org/en/jsr/detail?id=338) (JPA) is just a specification that defines an object-relational mapping (ORM) standard for storing, accessing, and managing Java objects in a relational database. [Hibernate](http://hibernate.org/) is the most popular and widely used implementation of JPA specifications. By default, Spring Data JPA uses Hibernate as a JPA provider.
Hibernate provides a framework for **mapping relational database tables to entity classes** in your application. You can describe the relationships between these entities as you define relationships among the tables in your relational database.
In this article, you'll **learn how to create a one-to-one mapping between two entities** using Spring Data JPA in a Spring Boot and MySQL application.
## Dependencies
You just need `spring-data-starter-data-jpa` and `mysql-connector-java` dependencies to use [Spring Data JPA with the MySQL database](https://attacomsian.com/blog/accessing-data-spring-data-jpa-mysql).
For a Gradle project, add the following dependencies to your `build.gradle` file:
```groovy
implementation 'org.springframework.boot:spring-boot-starter-data-jpa'
runtimeOnly 'mysql:mysql-connector-java'
```
For a Maven project, include the following dependencies to your `pom.xml` file:
```xml
org.springframework.boot
spring-boot-starter-data-jpa
mysql
mysql-connector-java
runtime
```
If you want to create a new Spring Boot project from scratch, just use [Spring Initializr](https://start.spring.io) web tool to bootstrap a new application with the above dependencies.
## Configure MySQL Database
By default, Spring Boot automatically configures the `DataSource` bean for in-memory databases like [H2 database](https://attacomsian.com/blog/spring-data-jpa-h2-database#configure-h2-database). But for MySQL, we need to manually define the database connection details in a properties file.
Open your `application.properties` file and add the following properties:
```properties
# MySQL connection properties
spring.datasource.driver-class-name=com.mysql.cj.jdbc.Driver
spring.datasource.username=root
spring.datasource.password=mypass
spring.datasource.url=jdbc:mysql://localhost:3306/testdb?createDatabaseIfNotExist=true&useSSL=false
# Log JPA queries
# Comment this in production
spring.jpa.show-sql=true
# Drop and create new tables (create, create-drop, validate, update)
# Only for testing purposes - comment this in production
spring.jpa.hibernate.ddl-auto=create
# Hibernate SQL dialect
spring.jpa.properties.hibernate.dialect=org.hibernate.dialect.MySQL5InnoDBDialect
```
Spring Boot will read the above properties and auto-configure a `DataSource` bean for you. Make sure to change the `spring.datasource.username` and `spring.datasource.password` properties to match your MySQL credentials.
The hibernate property `spring.jpa.hibernate.ddl-auto = create` will automatically create database tables based on the entity classes in your application on startup.
We have also included the `createDatabaseIfNotExist=true` configuration property in `spring.datasource.url` to automatically create the database if it doesn't already exist.
## One-To-One Relationship
A one-to-one relationship refers to the relationship between two entities/database tables A and B in which **only one element/row of A may be linked to one element/row of B**, and vice versa.
Let us consider an application scenario where you want to store users' information along with their addresses. We want to ensure that a user can have just one postal address, and a postal address can only be associated with a single user.
We can map the above requirement as a one-to-one relationship between the user and the address entities, as shown in the following Entity-Relationship (ER) diagram:
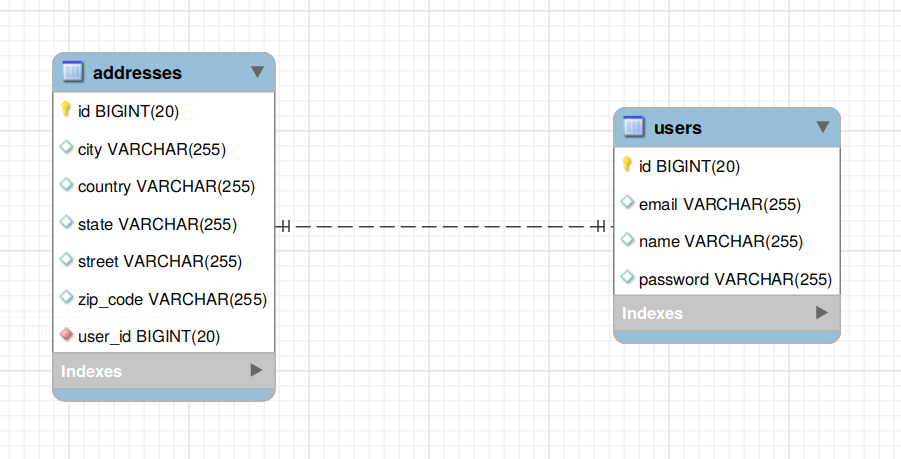
The one-to-one relationship is defined using a foreign key called `user_id` in the `addresses` table.
## Create Entities
You need to create the following two entity classes to map the above database tables.
### `User` Entity
Let us define the below `User` entity in your application to map the `users` database table:
```java
package com.attacomsian.jpa.one2one.domains;
import javax.persistence.*;
import java.io.Serializable;
@Entity
@Table(name = "users")
public class User implements Serializable {
@Id
@GeneratedValue(strategy = GenerationType.IDENTITY)
private Long id;
private String name;
private String email;
private String password;
@OneToOne(mappedBy = "user", fetch = FetchType.LAZY,
cascade = CascadeType.ALL)
private Address address;
public User() {
}
public User(String name, String email, String password) {
this.name = name;
this.email = email;
this.password = password;
}
// getters and setters, equals(), toString() .... (omitted for brevity)
}
```
### `Address` Entity
To map the `addresses` table, you need to define the following `Address` entity:
```java
package com.attacomsian.jpa.one2one.domains;
import javax.persistence.*;
import java.io.Serializable;
@Entity
@Table(name = "addresses")
public class Address implements Serializable {
@Id
@GeneratedValue(strategy = GenerationType.IDENTITY)
private Long id;
private String street;
private String city;
private String state;
private String zipCode;
private String country;
@OneToOne(fetch = FetchType.LAZY, optional = false)
@JoinColumn(name = "user_id", nullable = false)
private User user;
public Address() {
}
public Address(String street, String city, String state, String zipCode,
String country) {
this.street = street;
this.city = city;
this.state = state;
this.zipCode = zipCode;
this.country = country;
}
// getters and setters, equals(), toString() .... (omitted for brevity)
}
```
Both `User` and `Address` classes are annotated with `Entity` to indicate that they are JPA entities.
The `@Table` annotation is used to specify the name of the database table that should be mapped to this entity.
The `id` attributes are annotated with both `@Id` and `@GeneratedValue` annotations. The former indicates that they are the primary keys of the entities. The latter defines the primary key generation strategy. In the above case, we have declared that the primary key should be an `AUTO INCREMENT` field.
### `@OneToOne` Annotation
In Spring Data JPA, a one-to-one relationship between two entities is declared using the `@OneToOne` annotation. It accepts the following parameters:
* `fetch` — Defines a strategy for fetching data from the database. By default, it is `EAGER` indicating that the data must be eagerly fetched. We have set it to `LAZY` to fetch the entities lazily from the database.
* `cascade` — Defines a set of cascadable operations applied to the associated entity. `CascadeType.ALL` means to apply all cascading operations to the related entity. The cascading operations are applied when you delete or update the parent entity.
* `mappedBy` — Defines the entity that owns the relationship, which is the `Address` entity in our case.
* `optional` — Defines whether the relationship is optional. If set to `false`, then a non-null relationship must always exist.
In a bidirectional relationship, we have to specify a `@OneToOne` annotation in both entities. But only one entity is the owner of the association. Usually, the child entity owns the relationship, and the parent entity is the inverse side of the relationship.
### `@JoinColumn` Annotation
The `@JoinColumn` annotation is used to specify the foreign key column in the relationship owner. The inverse side of the relationship sets the `@OneToOne`'s `mappedBy` parameter to indicate that the relationship is mapped by the other entity.
The `@JoinColumn` accepts the following two parameters, among others:
* `name` — Defines the name of the foreign key column.
* `nullable` — Defines whether the foreign key column is nullable. By default, it is true.
## Create Repositories
Finally, let us create repository interfaces to save and retrieve `User` and `Address` entities from the database. We'll extend our repositories from Spring Data JPA's `CrudRepository` interface, which provides generic CRUD methods out-of-the-box.
### `UserRepository` Interface
Here is what our `UserRepository` interface looks like:
```java
package com.attacomsian.jpa.one2one.repositories;
import com.attacomsian.jpa.one2one.domains.User;
import org.springframework.data.repository.CrudRepository;
public interface UserRepository extends CrudRepository {
}
```
### `AddressRepository` Interface
The next step is to create the following `AddressRepository` interface:
```java
package com.attacomsian.jpa.one2one.repositories;
import com.attacomsian.jpa.one2one.domains.Address;
import org.springframework.data.repository.CrudRepository;
public interface AddressRepository extends CrudRepository {
}
```
That's all you need to do to define a one-to-one mapping in Spring Data JPA. Now, you're ready to perform the CRUD operations on the `User` and `Address` entities without implementing the above interfaces. This is what makes Spring Data JPA a powerful tool.
## Create an Application Class
Let us now create the main application for our Spring Boot [console application](https://attacomsian.com/blog/spring-boot-console-application) to test our one-to-one relationship mapping:
Application.java
```java
package com.attacomsian.jpa;
import com.attacomsian.jpa.one2one.domains.Address;
import com.attacomsian.jpa.one2one.domains.User;
import com.attacomsian.jpa.one2one.repositories.AddressRepository;
import com.attacomsian.jpa.one2one.repositories.UserRepository;
import org.springframework.boot.CommandLineRunner;
import org.springframework.boot.SpringApplication;
import org.springframework.boot.autoconfigure.SpringBootApplication;
import org.springframework.context.annotation.Bean;
@SpringBootApplication
public class Application {
public static void main(String[] args) {
SpringApplication.run(Application.class, args);
}
@Bean
public CommandLineRunner mappingDemo(UserRepository userRepository,
AddressRepository addressRepository) {
return args -> {
// create a user instance
User user = new User("John Doe", "john.doe@example.com", "1234abcd");
// create an address instance
Address address = new Address("Lake View 321", "Berlin", "Berlin",
"95781", "DE");
// set child reference
address.setUser(user);
// set parent reference
user.setAddress(address);
// save the parent
// which will save the child (address) as well
userRepository.save(user);
};
}
}
```
We've defined a `CommandLineRunner` interface bean in the main application class. This interface provides a `run()` method, which is automatically invoked by Spring Boot after the application context is loaded.
## Run the Application
Now is the time to run the application to see the output. If you are using Gradle, execute the following command to start the application:
```bash
$ ./gradlew bootRun
```
For Maven, type the following command to launch the application:
```bash
$ ./mvnw spring-boot:run
```
Once the application is started, you should see the following lines printed on the console:
```bash
Hibernate: drop table if exists addresses
Hibernate: drop table if exists users
Hibernate: create table addresses (id bigint not null auto_increment, city varchar(255), country varchar(255), state varchar(255), street varchar(255), zip_code varchar(255), user_id bigint not null, primary key (id)) engine=InnoDB
Hibernate: create table users (id bigint not null auto_increment, email varchar(255), name varchar(255), password varchar(255), primary key (id)) engine=InnoDB
Hibernate: insert into users (email, name, password) values (?, ?, ?)
Hibernate: insert into addresses (city, country, state, street, user_id, zip_code) values (?, ?, ?, ?, ?, ?)
...
```
> **Source Code:** Download the complete source code from [GitHub](https://github.com/attacomsian/code-examples/tree/master/spring-data-jpa/jpa-mappings) available under MIT license.
## Conclusion
That's all. In this article, you learned how to map and use a one-to-one relationship in Spring Data JPA and Hibernate.
In upcoming articles, I will explain in detail how to use [one-to-many](https://attacomsian.com/blog/spring-data-jpa-one-to-many-mapping) and [many-to-many](https://attacomsian.com/blog/spring-data-jpa-many-to-many-mapping) relationships in Spring Data JPA. Do not forget to join the [newsletter](https://attacomsian.com/newsletter) if you want to be the first to know when new tutorials are available.
## Further Reading
To learn about Spring Data JPA, check out the following articles:
* [Getting Started with Spring Data JPA](https://attacomsian.com/blog/getting-started-spring-data-jpa)
* [Spring Data JPA with H2 DataBase and Spring Boot](https://attacomsian.com/blog/spring-data-jpa-h2-database)
* [Accessing Data with Spring Data JPA and MySQL](https://attacomsian.com/blog/accessing-data-spring-data-jpa-mysql)
* [Derived Query Methods in Spring Data JPA](https://attacomsian.com/blog/derived-query-methods-spring-data-jpa)
* [Spring Data JPA Custom Queries using @Query Annotation](https://attacomsian.com/blog/spring-data-jpa-query-annotation)
* [How to Use Spring Data JPA Named Queries](https://attacomsian.com/blog/spring-data-jpa-named-queries)
* [Sorting Query Results in Spring Data JPA](https://attacomsian.com/blog/spring-data-jpa-sorting)
* [Pagination with Spring Data JPA](https://attacomsian.com/blog/spring-data-jpa-pagination)
* [Spring Data JPA One To Many Relationship Mapping Example](https://attacomsian.com/blog/spring-data-jpa-one-to-many-mapping)
* [Spring Data JPA Many To Many Relationship Mapping Example](https://attacomsian.com/blog/spring-data-jpa-many-to-many-mapping)