# How to upload and parse a CSV file using Spring Boot
By Atta Ur Rehman Shah (https://attacomsian.com/about). Published Jan 17, 2020, updated Sep 24, 2022. Topics: Spring Boot, Thymeleaf, CSV.
Canonical URL: https://attacomsian.com/blog/spring-boot-upload-parse-csv-file
> A step-by-step guide to learn how to upload and parse a CSV file in Spring Boot and Thymeleaf.
Comma Separated Values (CSV) is a popular data exchange format frequently used for importing and exporting data between servers and applications.
A CSV file is just a plain-text file that stores data in a tabular format where each row consists of one or more fields and each column represents a specific field. These fields are separated by a delimiter, usually a comma or a tab.
In an earlier article, I wrote about [exporting and downloading data as a CSV file](https://attacomsian.com/blog/export-download-data-csv-file-spring-boot) in Spring Boot. In this article, you'll learn how to upload and parse a CSV file using Spring Boot & Thymeleaf.
> **Note:** To read and parse a CSV file in core Java, check out [reading and parsing a CSV file in Java](https://attacomsian.com/blog/java-read-parse-csv-file) tutorial.
## Dependencies
To upload and parse a CSV file in Spring Boot, you only need the `spring-boot-starter-web` and `opencsv` dependencies.
Additionally, we also need `spring-boot-starter-thymeleaf` for serving Thymeleaf templates. The [OpenCSV](http://opencsv.sourceforge.net/) 3rd-party library will be used for parsing the uploaded CSV file.
Add the following dependencies to your Gradle project's `build.gradle` file:
```groovy
implementation 'org.springframework.boot:spring-boot-starter-web'
implementation 'org.springframework.boot:spring-boot-starter-thymeleaf'
implementation 'com.opencsv:opencsv:5.0'
```
For Maven, include the following dependencies to your `pom.xml` file:
```xml
org.springframework.boot
spring-boot-starter-web
org.springframework.boot
spring-boot-starter-thymeleaf
com.opencsv
opencsv
5.0
```
To create a new Spring Boot project from scratch, you can either use [Spring Initializr](https://attacomsian.com/blog/scaffolding-spring-boot-application#spring-initializr) or [Spring Boot CLI](https://attacomsian.com/blog/scaffolding-spring-boot-application#spring-boot-cli) to bootstrap a new application with the above dependencies.
## Model Class
OpenCSV allows us to directly map the [CSV record fields to a Java object](https://attacomsian.com/blog/read-write-csv-files-opencsv#reading-a-csv-file-with-each-record-as-a-java-object-using-annotations).
Let us create a simple model class named `User.java` that will be used to populate data from the CSV file:
User.java
```java
public class User {
@CsvBindByName
private long id;
@CsvBindByName
private String name;
@CsvBindByName
private String email;
@CsvBindByName(column = "country")
private String countryCode;
@CsvBindByName
private int age;
public User(long id, String name, String email, String countryCode, int age) {
this.id = id;
this.name = name;
this.email = email;
this.countryCode = countryCode;
this.age = age;
}
// getters and setters removed for the sake of brevity
}
```
As you can see above, we have annotated the `User` class attributes with the `@CsvBindByName` annotation.
OpenCSV provides this annotation to specify a binding between a column name of the CSV input and a field in a bean.
You can only use the `@CsvBindByName` annotation if the CSV file has a header. It accepts up to five parameters like `column`, `required`, and `locale`.
All parameters are options except `column`. The `column` paramter is only required if the header column name in the CSV file does not match the bean field name.
## Spring Boot Controller
Next, create a Spring Boot controller class named `UploadController.java` that handles the uploading and parsing of a CSV file:
UploadController.java
```java
@Controller
public class UploadController {
@GetMapping("/")
public String index() {
return "index";
}
@PostMapping("/upload-csv-file")
public String uploadCSVFile(@RequestParam("file") MultipartFile file, Model model) {
// validate file
if (file.isEmpty()) {
model.addAttribute("message", "Please select a CSV file to upload.");
model.addAttribute("status", false);
} else {
// parse CSV file to create a list of `User` objects
try (Reader reader = new BufferedReader(new InputStreamReader(file.getInputStream()))) {
// create csv bean reader
CsvToBean csvToBean = new CsvToBeanBuilder(reader)
.withType(User.class)
.withIgnoreLeadingWhiteSpace(true)
.build();
// convert `CsvToBean` object to list of users
List users = csvToBean.parse();
// TODO: save users in DB?
// save users list on model
model.addAttribute("users", users);
model.addAttribute("status", true);
} catch (Exception ex) {
model.addAttribute("message", "An error occurred while processing the CSV file.");
model.addAttribute("status", false);
}
}
return "file-upload-status";
}
}
```
As you can see above, we have annotated the `UploadController` class with `@Controller` to indicate that the annotated class is a web controller.
Each method is decorated with `@GetMapping` or `@PostMapping` to bind the path and the HTTP action with that particular method:
* GET `/` route renders an HTML form to allow a user to upload a CSV file.
* POST `/upload-csv-file` route handles HTTP `multipart/form-data` requests and accepts a `MultipartFile` object as a route parameter. This is where we parse the uploaded CSV file into a list of `User` objects using the `CsvToBean` class. This method returns an HTML response to either display a list of users or an error message.
## Thymeleaf Templates
The next step is to create Thymeleaf templates to allow users to upload a CSV file and display results. To nicely display the HTML form, we will use [Bootstrap 4](https://getbootstrap.com/) default styles.
### HTML Form for File Upload
Here is a simple HTML form that enables users to select a CSV file for upload:
index.html
```markup
```
### Display Upload Results
Let us create another Thymeleaf template to display the upload results:
file-upload-status.html
```markup
File Upload Status
Error:
| # |
ID |
Name |
Email |
Country |
Age |
|
|
|
|
|
|
```
## Running & Testing the Application
First of all, you need to create the main application class for the Spring Boot application, as shown below:
```java
@SpringBootApplication
public class Application {
public static void main(String[] args) {
SpringApplication.run(Application.class, args);
}
}
```
Let's run the application by typing the following command in your terminal from the root directory of the project:
```bash
$ ./gradlew bootRun
```
Once the Spring Boot application is started, open http://localhost:8080 in your favorite web browser to see the upload form. Here is what it looks like:

As shown in the above image, select a CSV file and click the "Import Users" button to kickstart the file upload operation.
If everything goes right, you should see a list of users displayed as shown in the following screenshot:
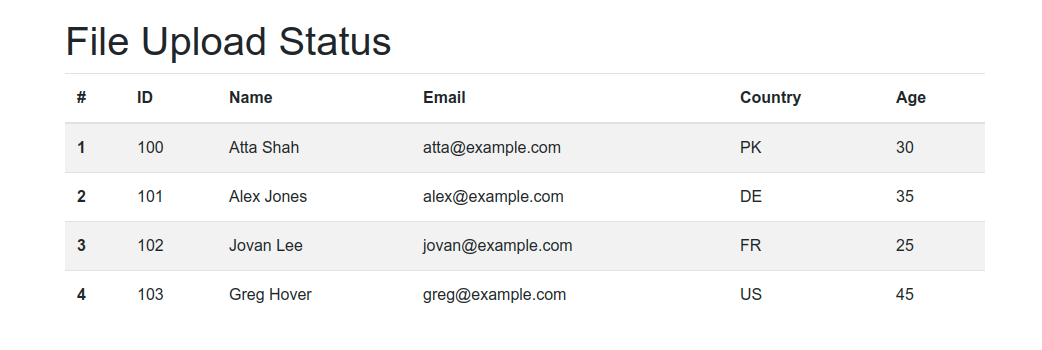
If you forget to select a CSV file or the CSV file is not valid, you should see the following error message displayed on the screen:

Finally, here is the sample CSV file I just uploaded in the above example:
users.csv
```csv
id,name,email,country,age
100,Atta Shah,atta@example.com,PK,30
101,Alex Jones,alex@example.com,DE,35
102,Jovan Lee,jovan@example.com,FR,25
103,Greg Hover,greg@example.com,US,45
```
> **Source Code:** Download the complete source code from [GitHub](https://github.com/attacomsian/code-examples/tree/master/spring-boot/parse-data-csv) available under MIT license.
## Conclusion
In this article, you have learned how to upload and parse a CSV file using Spring Boot and Thymeleaf in a web application. We used [OpenCSV](https://attacomsian.com/blog/read-write-csv-files-opencsv), a popular open-source library, for parsing the uploaded file into a list of Java objects.
## Further Reading
If you like this article, you may be interested in other Spring Boot articles:
* [Export & Download Data as CSV File in Spring Boot](https://attacomsian.com/blog/export-download-data-csv-file-spring-boot)
* [Uploading Files in Spring Boot](https://attacomsian.com/blog/uploading-files-spring-boot)
* [How to upload a file with Ajax in Spring Boot](https://attacomsian.com/blog/spring-boot-file-upload-with-ajax)
* [Reading and writing CSV files using OpenCSV](https://attacomsian.com/blog/read-write-csv-files-opencsv)